Hoods and Liripipes
These are becoming old fashioned by our period, but they are still in use as travelling and outdoor wear, and at re-enactments. Hoods should fit fairly tightly to the head and many pictures show them being worn with hats underneath. The only difference between the hood and liripipe is the tail!
However, hoods did vary somewhat, as ones without any fastenings must be looser than those that button under the chin. Some even had a scalloped, zaged or diamond dagging!


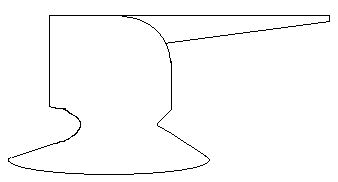
The basic shape of a hood is as shown: you cut two of this shape to get more room over the shoulder, and extra V shaped pieces can be added. Surviving examples either have a triangle let in under the ear or in the centre front. If you choose to have a liripipe (the long tail) then this is cut all in one and it needs to be long or it will not hang properly at the crown of the head. If you want it to be very long, it may have to be pieced halfway down. The inside of the liripipe does not need to be lined; you can cut the inside of the hood in a simple curve.
Some hoods are open at the centre front and have buttons to fasten them, there are often lots of buttons and the hood extends out around the face so the buttons come right up under the chin. Sometimes there is a folded back area as shown in the photo above. This type of hood seems to have been more common as a woman's hood. In fact, with a liripipe and a coif under, it can be used as a head-dress in its own right, which would normally be worn open.
Other hoods can be joined at the front with a simple button just under the chin. Fashionable hoods would have (if you are using a heavily fulled cloth) dagging around the edges, so you would not have to fully line this hood; otherwise they would always be fully lined.
Making the Hood
This is one of those strange patterns to make; you can either look at the pattern and draw your own using your best guess, borrow some one else's and try to adjust it to you or try the following pattern. Good luck with whatever you decide!
This is one of those strange patterns to make; you can either look at the pattern and draw your own using your best guess, borrow some one else's and try to adjust it to you or try the following pattern. Good luck with whatever you decide!
I would strenuously suggest that you make a scrap material pattern for your hood before commencing on your garment.
Material: Linen lining with thick woven wool exterior (to keep the rain out).
Colour: Whatever goes with your other garments.
Colour: Whatever goes with your other garments.
- Wrap a tape measure around your face, under your chin and over the top of your head, and add 4-6 inches.
- Divide that number in half and write your measurement on your drawing.
- Measure the distance from your brow, over your head and down to your shoulders; add 4-6 inches to this measurement.
- Then measure around your shoulders and add 4-6 inches, divide this measurement in two.
- Measure from shoulder to shoulder via the top of your head and add 4-6 inches, divide this measurement in two.
- You now have all of the measurements that you will need to make the pattern. Now the fun starts, you need to keep the shape of the hood as shown above but also include your measurements so it will fit you.
Once you are happy with your shape, sew the lining pieces and the wool pieces together before joining them together. Remember to leave a gap so you can pull your garment through the hole to right side it.
